

Many, many years ago, in a land far, far away, there was a young art student named Christina.
The world was brand new back then and the possibilities, endless. And everyday, lugging an enormous black portfolio almost as big as she, young Christina would head to day-long art classes to paint dead fish.
And although, after many, long, balmy hours left unrefrigerated, the fish would inevitably spill their guts (literally) — and give her the driest of heaves — it was still something to see.

Image from Oh-MyStyle.Blogspot.Com
This happened a lot.
Almost as often, would be trips to the Museum of Art to see paintings that would simultaneously piss her off and make her feel like the luckiest girl alive.
This also happened a lot.
Lugging her portfolio, battling gale-force winds and trying her best not to achieve lift-off, on her way there she would pass pretzel carts, where she would, without fail, give in and buy one.
Huge and as heavy as a brick, it would take forever to finish and sit for hours at the bottom of her stomach like a snow globe paperweight.

Image from MyLesPaul.Com
It was great.
Though that time is long gone now and painting dead fish a memory, that Christina is still this Christina.
The world is not as brand new as it was back then, but the possibilities are still endless and I still love me a good soft pretzel.
So I headed to the kitchen to make some soft pretzels of my own and share them with all of you.
These, my friends, are something else.
And when I say something else, I mean good.
Brown-butter-and-slow-rise good.
And unlike the pretzel-cart pretzels of long ago, there is nothing brick or paperweight-like about them.
I’m not going to lie. They take time and effort to make. But don’t let that scare you. Like a good painting, good things can’t be rushed.

Image from News.Discovery.Com
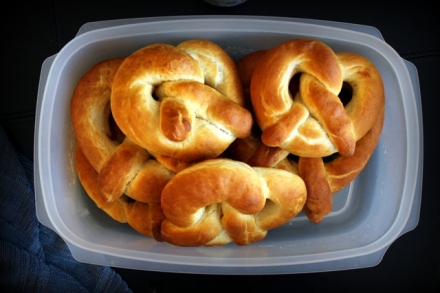
Tender and chewy — with just the right amount of substance — they have a subtle, nutty toasty-ness to them. That’s the brown butter talking.
And less like the heavy, super-dense soft pretzels we know (and still love), they’re more Auntie Anne’s but so much better, they’re not even in the same ballpark.
Slightly sweet with only a touch of saltiness, they demand to be dipped in melted butter, beer cheese sauce (I said it) or some good, old-school-style yellow mustard. Or more brown butter.
Or simply dip them in melted butter and sprinkle them with salt.
Ooh, or cinnamon sugar.
Better still, depending on how thick or thin you roll them, they can be made into thin pretzels, fat pretzels, like mine, or even pretzel rolls. (I know, mind blown).
Just as in life, my friends, the possibilities are endless.
Brown Butter Slow-Rise Soft Pretzels
There’s fast-rise and then there’s slow-rise. There’s butter and then there’s brown butter. Put brown butter and slow-rise together and one elevates the already mighty pretzel into something special.
Inspired by Yammie’s Noshery and Leite’s Culinaria
Makes 12 large pretzels
1/4 cup baking soda
4 tablespoons unsalted butter, (Kerrygold is the best)
2 cups + 3 tablespoons organic whole milk
2 packets active dry yeast (I like SAF brand yeast)
5 tablespoons light brown sugar, lightly packed
4 cups all-purpose flour
3/4 cup whole wheat flour
1 1/2 teaspoons sea salt
Ideas for serving
4 – 6 tablespoons unsalted butter, melted in a shallow dish, for dipping
Fleur de Sel or any coarse salt
French’s yellow mustard or any other kind you prefer
Beer cheese sauce
Cinnamon sugar
Brown butter, for dipping
The day before serving
Adjust oven rack to middle level and preheat oven to 250 Degrees F. Grease a large stock pot (with lid) well with unsalted butter. Set aside.
In a pie pan or a small rimmed baking sheet, spread baking soda and cover lightly with aluminum foil. Bake for one hour, remove from oven and let cool completely in pan. Transfer to small Tupperware container, cover tightly with lid. Set aside.
Note: What we’re doing here by baking the baking soda is changing the chemical properties of it to act in a very similar way to lye (which is what they use in commercial bakeries to achieve the pretzel’s unique flavor, chewy texture and wonderful color). It’s worth the extra step.
Meanwhile, while you’re waiting for the baking soda to bake — in small saucepan over medium-low heat — melt butter stirring often until it turns brown. Remove from heat and set aside to cool.
Note: Be sure to watch butter very carefully while you are doing this because it can go from brown to burnt in a heartbeat. Burnt butter tastes bitter. What we’re going for is a nice, nutty toasty-ness.
In a small mixing bowl in the microwave or small saucepan over medium heat, warm milk to 100 – 110 Degrees F.
Note: Using an instant read thermometer to do so is easiest. Be sure to not go any warmer than 110 Degrees F as it will harm the yeast and prevent the dough from rising properly.
Pour warmed milk into a large mixing bowl. Add yeast and light brown sugar to warmed milk and — using a soon — stir well to dissolve. Set milk mixture aside to proof a bit, about 7 minutes.
Once milk mixture has proofed — using a large spoon, wooden or otherwise — stir in the cooled brown butter, all-purpose flour, whole wheat flour and sea salt into milk mixture and stir until mixture comes together and everything is well incorporated.
Note: At this point you’ll need to start using your hands. Pull out the dough and — on a very lightly floured surface — knead it with your hands until it is slightly tacky but not sticky. If it’s too wet, add some more whole wheat flour — a tablespoon at a time — kneading well each time until you reach desired consistency.
Form dough into a rough ball.
Place dough into prepared, greased stock pot, cover stock pot with plastic wrap, then with lid and let rise for 8 – 24 hours in the refrigerator.
Note: Slow-rise = the longer the rise, the better and more complex the flavor, which means no less that 8 hours but no more than 24. I let mine rise for 16.5 hours and it turned out great.
On the day of serving
Cover large baking sheet with parchment paper and set aside.
Adjust oven rack to middle level and preheat oven to 450 Degrees F.
Very lightly flour clean work surface with flour. Remove stock pot containing dough from refrigerator and with your hands, invert pot and gently pull dough out onto flour.
Punch down dough with your hands and — using a sharp knife — divide into 12 equal-sized pieces.
Note: An easy way to do this is to cut the dough in half, then to cut each half into three, and then cut each remaining piece into half again.
Cover dough pieces lightly with the plastic wrap you used to cover stock pot and let rest for 10-15 minutes.
In the meantime — in a very large glass mixing bowl — combine your prepared baked baking soda with 8 cups very warm water until dissolved. Set aside.
Note: Water temperature should be almost uncomfortable to dip your hand in.
Using your hands and working with one piece of dough at a time — starting from the middle and moving outwards and then back to the middle and out again each time — roll your first 6 pieces of dough out as long and as thin as you can. Keep remaining pieces lightly covered with plastic wrap until you are ready to roll them.
Note: If you are looking to make more traditional-looking soft pretzels, shoot for each piece to be about 36 or more-inches long. The longer the better. If you’d like to make more fat-looking pretzels, like mine, aim for about 29-30 inches. And if it’s pretzel rolls you’re after, close to 24 inches should do the trick.
Form your rolled-out dough into pretzel shapes and transfer to prepared parchment-lined baking sheet.
Using a slotted spatula — gently submerge each pretzel into your warm, baked baking soda solution for 30 seconds, fish out, drain and place back onto parchment-lined baking sheet, making sure to leave at least 1-inch of space between each.
Note: At this point, one traditionally sprinkles coarse salt over pretzels but I recommend not doing so unless you plan on eating all the pretzels in one day. Reason being is that stored, covered soft pretzels release moisture and any salt on them will melt into little wet pools on your pretzels. Damp pretzels = No bueno. So, instead, I recommend leaving the coarse salt off and sprinkling it on — if you wish — upon serving.
Transfer baking sheet with first six pretzels to middle of oven rack and bake for 7 – 12 minutes — checking at the 6 minute mark — or until pretzels are a nice, deep, golden brown.
When pretzels are ready, remove from oven and let cool on baking sheet for 1-2 minutes. Using a slotted spatula, transfer pretzels to wire cooling rack to cool for 4 minutes more.
Note: At this point, you can go ahead and serve the pretzels or just wait until you’re done making the remaining six.
Line your baking sheet with new parchment paper and repeat the last five steps with the last 6 pieces of dough.
Serve while still warm with your choice of toppings and … enjoy!

Falling in love already… must bake… and I love your story. 🙂
Thanks so much, Rachel, and love your mini pies =)
These are so cute! 🙂
So glad you like ’em, Cindy, and BTW, your blog is fascinating! I love the cost breakdowns for all the recipes — a gal after my own budget-minded heart =)
Ooo, they look very delectable, Christina. Good to see your posts. 🙂
Thanks so much, Fae, and so good to see you! Looking forward to swinging by and seeing what you’ve been up too, as well =)
this looks great and yummy.
Thanks, Magdalena!
I loooooove brown butter. Ah, even the words sound beautiful. These soft pretzels look gorgeous Christina, so golden and chewy! We gorged ourselves on soft pretzels in Germany, they’re incredible with a nice pint of weissbier… but BEER CHEESE SAUCE? Argh!! Delicious. I love your reflections in this post, too. I think that age and responsibility definitely shouldn’t blind us from the wondrous possibilities that life brings. Thanks for the reminder xx
Thanks so much, Laura, on all accounts. I know, beer cheese sauce, incredible, right?! And yes, re: age and responsibility! Over the course of time, I have also come to believe that one of the most important qualities to nurture in oneself is childlike curiosity. We all had it when we were little and I think it’s unfortunately one of the easiest things to lose the older we get, but so important, you know? That sense of possibility comes from that young part of ourselves; all wonderful things, no matter what our age =)
It was a pleasure meeting you at Barnes and Noble, and what a blessing to be able to share your scientifically insightful and yummy blog with my friends. Thank you for taking the time to share your joy of creating!
It was a pleasure meeting you, Donna, and so glad you stopped by Small Kitchen Chronicles! Thank you for wanting to share it with your friends — you are all welcome here anytime =)
Oh these look AMAZING.
Thanks; glad you like them! =)