
As I said a couple of weeks ago, I spent a fair bit of time in the kitchen on my trip to Delhi in March. I learned some new things and also improved my skills with some others. These masoor dal pakodas fall in the former category and mooli parathas fall in the latter. I will be the first to admit that I am not the most adept maker of chapatis and parathas in the world. I don’t have the best skills with a rolling pin. But what I lack in natural ability I almost make up for in perseverance and so at this point I turn out pretty good chapatis and parathas—plain ones as well as anda/egg parathas and alu/potato parathas. I’ve always been wary of mooli/radish parathas though, even though they are a close second to alu parathas in my personal stuffed paratha rankings. (It’s hip to say that alu parathas are boring compared to mooli or gobi/cauliflower parathas but I didn’t get where I am today—nowhere—by being hip.) This because mooli parathas are a lot more fiddly. For one thing, unlike potatoes, the mooli/radish is shredded not mashed which makes for a more uneven filling. For another, the shredded mooli gives off a lot of water and moist paratha stuffing is not easy to deal with. This can make rolling the stuffed dough a challenge for those of us who are not naturals with a rolling pin. I did get some hands-on lessons from my parents’ cook on this trip though and I am glad to report that the results have been very good. Being a generous guy I will share my success with you.
If you’re already good with making stuffed parathas of any kind you don’t really need to be reading this. If you’re not, these are the things that have dramatically improved my mooli paratha skills:
- Make a much moister dough than you would for plain parathas. The softer, more elastic dough will help keep the stuffed dough from splitting when you roll it. (This also helps with alu parathas.)
- Grate the mooli as fine as you can. Because it’s not going to spread inside the dough the way mashed potato does, if your mooli is shredded too long or coarse you’ll be at risk of ending up with “air pockets” in your dough ball, which will also increase the chance of major splittage when you roll or when you flip the paratha on the tava.
- Let the grated mooli sit by itself to give off water and squeeze the water out tightly by hand before adding adding the other flavourings. This I used to already do but would still end up with a more moister filling than I would like. The easiest way to avoid this I now know is to not to add salt to all the grated radish along with the other flavourings. Instead salt the stuffing for each dough ball just before you roll it (see slideshow below).
You will also have greater success if you don’t overstuff your parathas but I can never resist. But with the tips above I still manage to keep splits to a minimum. And, of course, unlike with alu parathas you should resist the urge to make mooli parathas very large: a 6 inch radius is good. And you’ll also fry it to more of a crisp than the average alu paratha. My only other tips are that you should use sharbati aata—a type of aata/whole wheat flour from Madhya Pradesh that yields very soft chapatis and parathas—and that you should not worry too much about proportions of flour and water while making the dough. And oh, use your hands to knead the dough.
Okay, let’s get to it.
Ingredients
For the stuffing:
- Roughly 1/2 lb daikon radish, peeled and grated fine
- 1/2 cup red onion, minced
- 2-3 Thai chillies, seeded and minced
- 1/2 cup dhania/cilantro, minced
- 1 big pinch amchur/dried mango powder
- 1/2 tspn mild red chilli powder
- 1/2 tspn ground zeera/cumin
- 1 tspn salt, preferably rock/black salt, set aside
For the dough (for 4 thick parathas):
- 1 cup sharbati aata, plus more as needed
- 1 tblspn ghee
- 1/2 tspn salt
- Roughly 1/2 cup barely lukewarm water, plus more as needed
For frying the parathas:
- Ghee or neutral oil, as needed.
Preparation
For the stuffing:
- Let the grated radish sit for at least half an hour to give off as much moisture as it can. I let it sit in a small colander over a big bowl so I can catch the water as it separates and save it for the dough.
- Squeeze the radish hard with your hands to extract as much moisture as you can and remove each squeezed handful to a separate bowl, reserving all the water you have squeezed out of the radish.
- Add the onion, dhania and green chillies to the radish along with all the spices except the rock salt. Mix in well by hand and set aside as you prepare the dough.
For the dough:
- Add the salt to the flour, add the ghee and mix it all in by hand, crumbling the dough with your fingers.
- Add the water let off by/squeezed from the radish to the flour and add as much water as needed to make a moist dough. Don’t worry if it seems like you’ve added too much—just add a bit more flour at a time and knead it in.
- Once you have a dough that’s not shaggy but is still moist and soft, knead it vigorously for a few minutes, turning it in on itself a few times and shaping it into a ball.
To make the parathas (one at a time):
- Heat your tava/griddle over medium heat.
- Roll the dough by hand into a thick cylinder and cut it into 4 equal pieces. Roll each back into a ball.
- Take a ball of dough in the palm of one hand and with the fingers of the other push it down in the center and shape it into a much wider disk with raised edges.
- Place a big dollop of the radish mixture in the center of the disk, pushing down gently with your fingers to pack it tighter; add a pinch of the rock salt and fold the edges of the disk over as though you are making a dumpling.
- Seal the top and roll the now larger ball gently in your palm to seal completely.
- Flour your rolling surface well and place some more flour in a plate alongside.
- Place the stuffed ball on the floured surface and press down with the heel of your palm into a disk.
- Pick up the disk and turn it a couple of times in the flour on the plate.
- Put the floured disk back on the rolling surface and with a rolling pin roll it into the best circle you can manage with as few rolls of the pin as you can manage.
- Add a tblspn of oil/ghee to the hot tava and place the rolled paratha on it. Press down gently with a wide spatula and let it cook till it has sealed.
- Add more oil/ghee around the edges of the paratha, insert the spatula gently under the paratha and flip it over.
- Cook the second side till crisp and flip again to crisp the top as well, adding more ghee/oil as needed around the edges.
- Remove to a plate and fry the next paratha, which you should have stuffed and rolled while the previous was cooking.
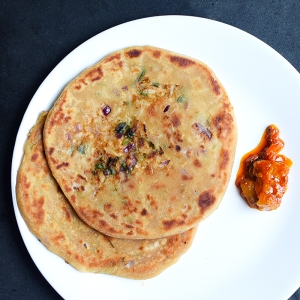
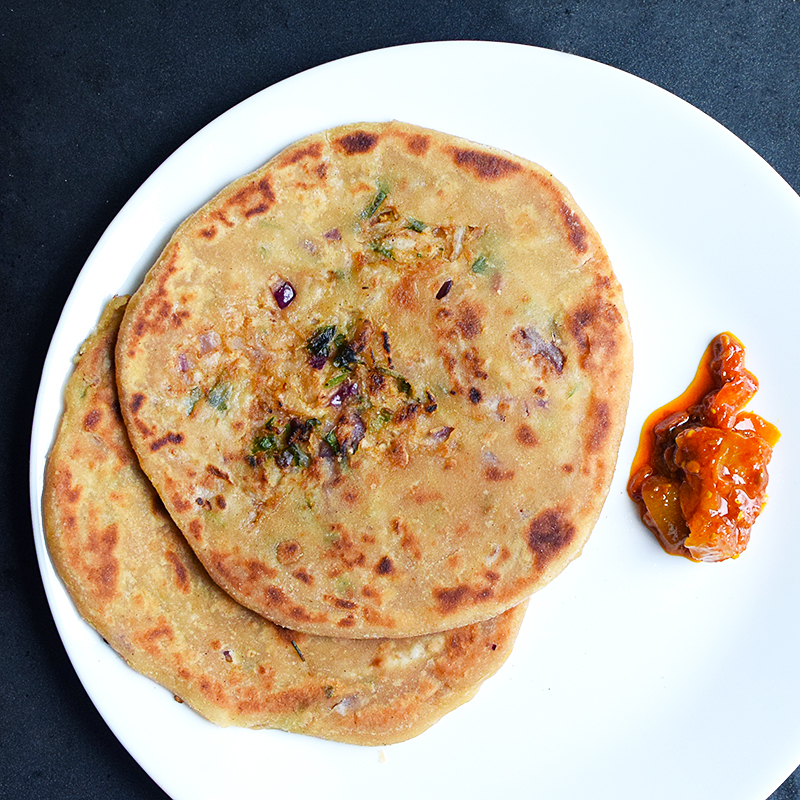
- Eat/serve hot with raita and achaar.


Notes
- This may all seem a little forbidding but believe me, if I can make decent parathas, so can anyone else. And I can make solid B+ mooli parathas. If you are a whiz with a rolling pin you’ll soon be making better parathas than me.
- And if you can resist over-stuffing them—as I never can—your life will be easier from the get-go. But if your parathas split, either while rolling or flipping, don’t sweat it. Ruptured mooli parathas are the norm. As you can see from my pictures, most of mine suffer that fate before they leave the tava.
- Don’t worry if you have a lot of seasoned radish left over. Just add yogurt to it and beat it all together to make your raita, loosening it a bit with some milk.

Maharashtrian people make thalipeet using radish and it is very tasty
LikeLike